iOS Remote Push Notifications with a Node.js backend
Posted on February 14, 2017 by Paul
In this tutorial I will show you how to get started with Swift 3 and iOS 10 push notifications, using your own custom Node.js server. Please note that there are plenty of alternatives to the custom server solution I will present here, like Firebase and similar services, these will start charging you a monthly fee after you reach a certain number of users. Using your own server is advantageous if you want complete control over what software you run on it and how you store and use your data.
If you want to follow this tutorial you will need to be a paying member of the Apple Developer Program and have an iOS device. It is also recommended, but not required, that you have a working web server with root access. Personally, I tend to use DigitalOcean, but you can use any VPS provider. For the purpose of this article, I will show you how to use a local web server.
Start by creating a new iOS, Single View Application, make sure that you’ve filled all required fields for the project options:
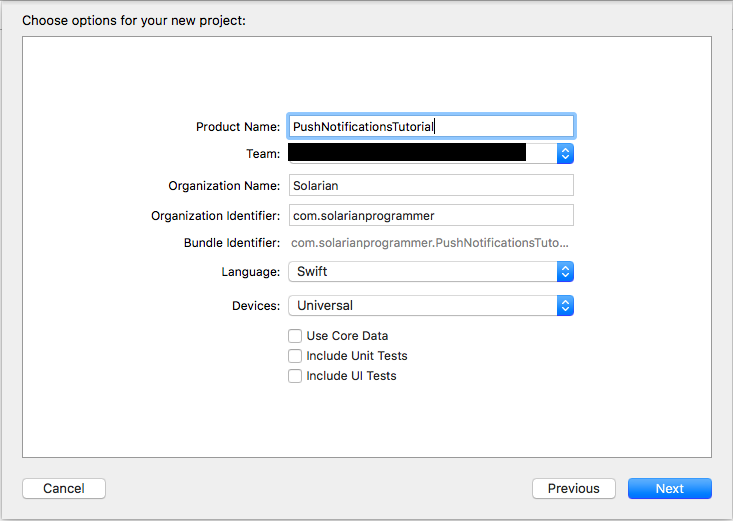
Once the project is created, open the Capabilities panel and toggle the Push Notifications button:
If, after you’ve enabled the push notifications capabilities, you see something red, close and reopen Xcode.
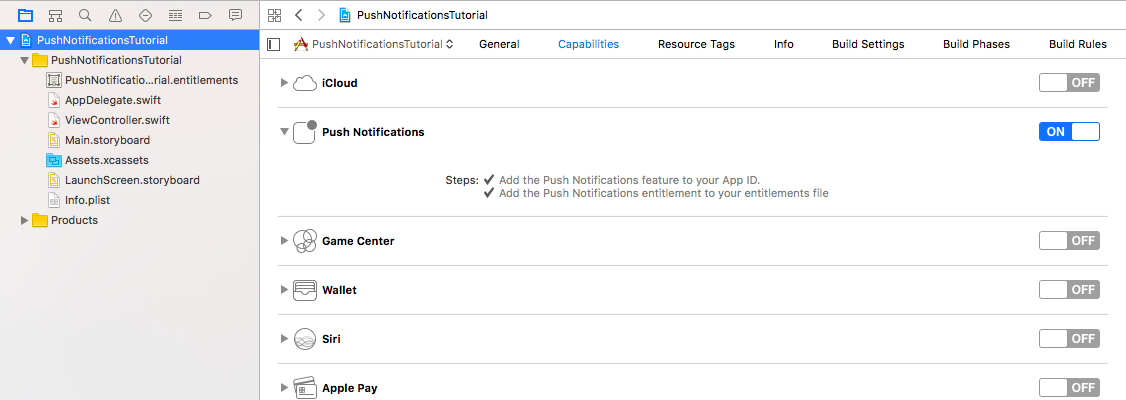
Next, log in to your Apple Developer account and, from the left panel, select Certificates, IDs & Profiles. Under Certificates select APNs Auth Key:
Use the + button to create a new certificate. On the What type of certificate do you need? page, scroll down and select Apple Push Notifications Authentication Key (Sandbox & Production:
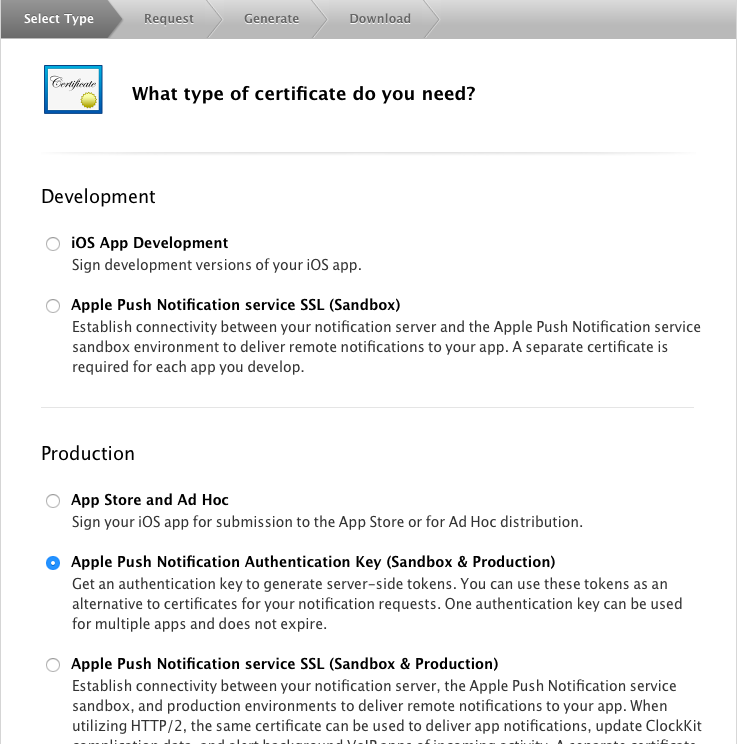
Press Continue at the bottom of the page.
On the next page make a note of the Key ID and download the certificate:
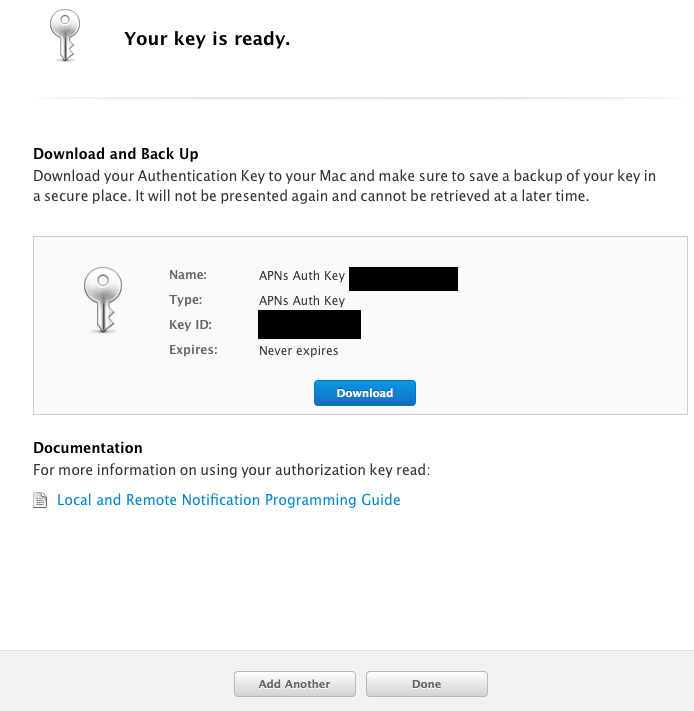
Be sure to store a copy of the certificate in a safe place.
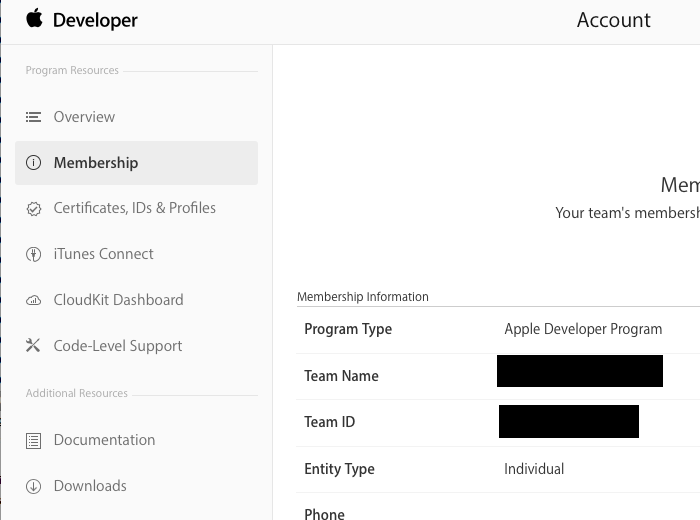
Before leaving the Apple Developer page, go to your account, select Membership and make a note of your Team ID:
Time to write some actual code!
Open AppDelegate.swift and import the UserNotifications module:
1 import UIKit
2 import UserNotifications
Next, in the application(_:didFinishLaunchingWithOptions:) prepare to ask the user to authorize the use of notifications for this application:
1 func application(_ application: UIApplication, didFinishLaunchingWithOptions launchOptions: [UIApplicationLaunchOptionsKey: Any]?) -> Bool {
2
3     UNUserNotificationCenter.current().requestAuthorization(options: [.badge, .alert, .sound], completionHandler: {(granted, error) in
4     })
5     application.registerForRemoteNotifications()
6
7     return true
8 }
Now, we can add three callback functions to manage the remote notifications:
1 func application(_ application: UIApplication, didRegisterForRemoteNotificationsWithDeviceToken deviceToken: Data) {
2 }
3
4 func application(_ application: UIApplication, didFailToRegisterForRemoteNotificationsWithError error: Error) {
5 }
6
7 func application(_ application: UIApplication, didReceiveRemoteNotification userInfo: [AnyHashable : Any]) {
8 }
If the application was correctly configured and the user accepts to receive remote notifications the first function from above will be called with a device token that uniquely identifies the application and the user device. This device token is used to push, or send, notifications to a particular user and device. In a real world application you will need to save the token for each user in a database. For the purpose of this article we will simply copy the device token and use it directly in the server code. Please note that the device token can be changed by iOS, for example if the user reinstalls the application, in this case you will need to resend it to the notification server.
We can print the device token in the debug console:
1 func application(_ application: UIApplication, didRegisterForRemoteNotificationsWithDeviceToken deviceToken: Data) {
2 	// code taken from http://stackoverflow.com/questions/37956482/registering-for-push-notifications-in-xcode-8-swift-3-0
3     let deviceTokenString = deviceToken.reduce("", {$0 + String(format: "%02X", $1)})
4     print("success in registering for remote notifications with token \(deviceTokenString)")
5 }
If the registration failed we’ll print the error:
1 func application(_ application: UIApplication, didFailToRegisterForRemoteNotificationsWithError error: Error) {
2     print("failed to register for remote notifications: \(error.localizedDescription)")
3 }
Next, we can print the actual notification:
1 func application(_ application: UIApplication, didReceiveRemoteNotification userInfo: [AnyHashable : Any]) {
2     print("Received push notification: \(userInfo)")
3     let aps = userInfo["aps"] as! [String: Any]
4     print("\(aps)")
5 }
When you will first run the application on your device you will be asked if you want to accept notifications from the application:

Make a note of your particular device token, for example in my case the token looks like this:
1 success in registering for remote notifications with token
2 16938391310CF7F1CF83AB0418B373B5BC52E2C449A6CC8F997ECD5E50574F0E
Next, install Node.js if it is not already installed on your machine. Obviously, you can install Node.js on a dedicated server if possible.
In order to send notifications to Apple’s servers we will use node-apn. Open a Terminal and install the prerequisites:
1 mkdir notifications_server && cd notifications_server
2 npm init
3 npm install apn --save
Copy the .p8 certificate file previously saved in the notification_server folder, for simplicity I’ve renamed this cert_notifications.p8. Create a file named server.js:
 1 "use strict";
 2
 3 const apn = require('apn');
 4
 5 let options = {
 6   token: {
 7     key: "cert_notifications.p8",
 8     // Replace keyID and teamID with the values you've previously saved.
 9     keyId: "YOUR_KEY_ID",
10     teamId: "YOUR_TEAM_ID"
11   },
12   production: false
13 };
14
15 let apnProvider = new apn.Provider(options);
16
17 // Replace deviceToken with your particular token:
18 let deviceToken = "16938391310CF7F1CF83AB0418B373B5BC52E2C449A6CC8F997ECD5E50574F0E";
19
20 // Prepare the notifications
21 let notification = new apn.Notification();
22 notification.expiry = Math.floor(Date.now() / 1000) + 24 * 3600; // will expire in 24 hours from now
23 notification.badge = 2;
24 notification.sound = "ping.aiff";
25 notification.alert = "Hello from solarianprogrammer.com";
26 notification.payload = {'messageFrom': 'Solarian Programmer'};
27
28 // Replace this with your app bundle ID:
29 notification.topic = "com.solarianprogrammer.PushNotificationsTutorial";
30
31 // Send the actual notification
32 apnProvider.send(notification, deviceToken).then( result => {
33 	// Show the result of the send operation:
34 	console.log(result);
35 });
36
37
38 // Close the server
39 apnProvider.shutdown();
Pay attention that you need to change keyID, teamID, deviceToken and notification.topic for your particular settings.
You can run the code with:
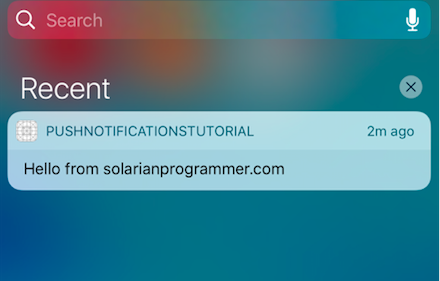
1 node server.jsThis is what I see on my phone if I run the above code:
If you want to learn more about Swift and iOS programming I would recommend reading Swift Programming by Matthew Mathias and John Gallagher:
or iOS Programming by Christian Keur and Aaron Hillegass: